Have you recently purchased a passive subwoofer and want to connect it to your receiver? Perhaps you’re not sure where to start or worry about making a mistake that could damage your equipment. Well, fear not, because in this guide, I will walk you through the step-by-step process of connecting your passive subwoofer to your receiver, ensuring that you can enjoy enhanced audio quality without any hassle or risk.
Key Takeaways:
- Ensure compatibility: Before connecting a passive subwoofer to a receiver, make sure that the subwoofer is compatible and that the receiver has a dedicated subwoofer output or a speaker-level output connection.
- Use appropriate cables: Use the appropriate cables to connect the passive subwoofer to the receiver. For a subwoofer with speaker-level inputs, use speaker wire, and for a subwoofer with RCA inputs, use an RCA cable.
- Adjust settings: After connecting the passive subwoofer to the receiver, adjust the receiver’s settings to enable the subwoofer output and set the crossover frequency and volume levels for optimal performance.
Factors to Consider When Connecting a Passive Subwoofer to a Receiver
Some factors you should consider when connecting a passive subwoofer to a receiver are:
- Power handling capacity: Ensure that the power handling capacity of your subwoofer is compatible with the power output of your receiver.
- Impedance matching: Match the impedance of your subwoofer with the impedance specifications of your receiver to prevent damage to your audio system.
- Wiring and connectors: Use the appropriate wiring and connectors to ensure a secure and reliable connection between your subwoofer and receiver.
This will help you achieve the best performance and prevent any damage to your equipment.
Compatibility of Passive Subwoofer and Receiver
When connecting a passive subwoofer to a receiver, it is crucial to ensure that the impedance and power handling capacity of the subwoofer are compatible with the receiver. Mismatched impedance can lead to overheating and potentially damage your equipment. Similarly, connecting a subwoofer with a lower power handling capacity to a high-powered receiver can result in blown speakers. Therefore, always check for compatibility before making the connection.
Checking Audio Quality of Your Receiver
Before connecting a passive subwoofer to your receiver, it is essential to verify the audio quality of your receiver. A receiver with poor audio quality can significantly affect the overall sound performance of your subwoofer. Check for any distortion, noise, or lack of clarity in the sound output of your receiver to ensure that you are getting the best audio experience from your subwoofer.
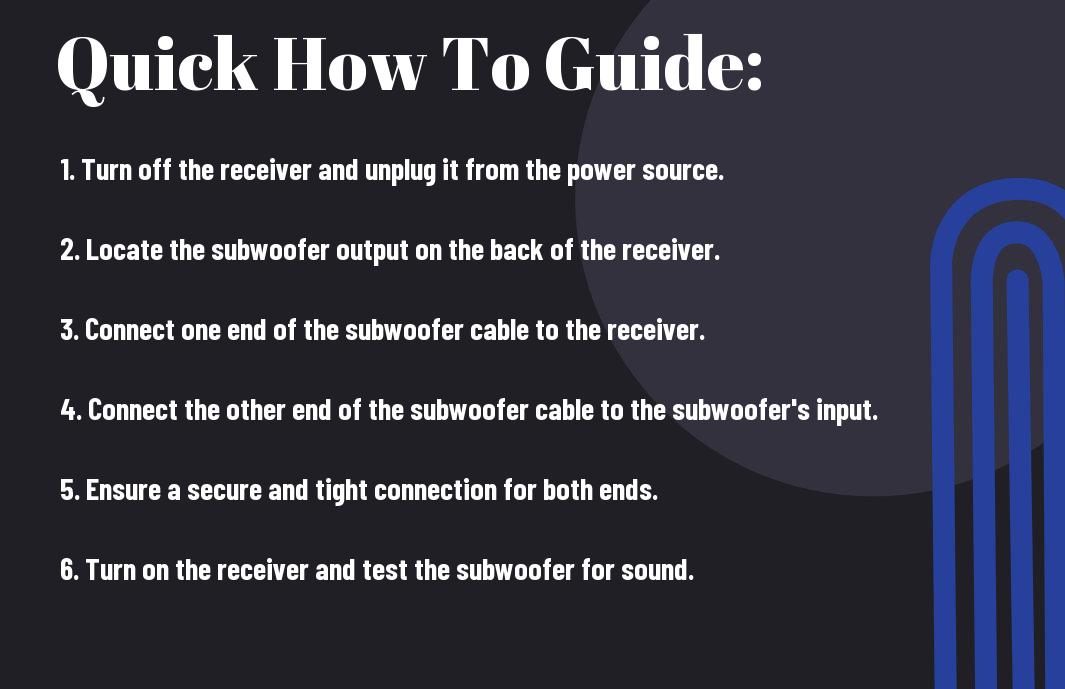
How-To: Step-by-step Guide to Connect Passive Subwoofer to Receiver
However, connecting a passive subwoofer to a receiver can be a bit tricky if you’re not familiar with the process. It’s important to ensure that you follow the correct steps to achieve the best sound quality and avoid damaging your equipment. Here’s a step-by-step guide to help you connect your passive subwoofer to your receiver.
Positioning Your Subwoofer and Receiver
Before you begin connecting your subwoofer to your receiver, it’s crucial to ensure that both the subwoofer and receiver are positioned correctly in your home theater setup. Your subwoofer should ideally be placed in a corner or along a wall to maximize bass response. The receiver should be placed in a central location, free from obstructions that could block the signal to your subwoofer.
Detailed Steps to Connect Your Subwoofer and Receiver
When connecting your passive subwoofer to your receiver, you’ll need to follow a specific set of steps to ensure a proper connection. This typically involves using speaker wire to connect the subwoofer to the receiver’s dedicated subwoofer output. You’ll also need to configure the receiver’s settings to properly route the low-frequency signals to the subwoofer. It’s essential to follow the manufacturer’s instructions for both the subwoofer and receiver to ensure a correct setup.
Tips to Enhance Your Subwoofer Connection
After connecting your passive subwoofer to your receiver, there are a few tips you can follow to enhance your subwoofer connection. Here are some tips to help you get the most out of your subwoofer:
- Use high-quality speaker wire to ensure a strong and stable connection.
- Experiment with placement to find the best spot for your subwoofer in your room.
- Calibrate your receiver settings to achieve the best sound balance between your subwoofer and other speakers.
The key to enhancing your subwoofer connection is to take the time to experiment and optimize the settings to achieve the best possible audio experience.
Understanding the Receiver’s Subwoofer Output
When connecting a passive subwoofer to a receiver, it’s important to understand the subwoofer output on your receiver. Many receivers have a dedicated subwoofer output that allows you to route low-frequency signals to your subwoofer. This output is essential for sending the right frequencies to your subwoofer, enhancing the overall sound quality of your audio system.
Proper Maintenance of Your Subwoofer and Receiver Connection
Proper maintenance of your subwoofer and receiver connection is crucial for ensuring optimal performance of your audio system. It’s important to regularly check the connections to ensure they are secure and free from any damage or interference. Additionally, keeping your subwoofer and receiver dust-free and in a well-ventilated area can help prolong their lifespan and prevent any potential issues.
Conclusion
Hence, connecting a passive subwoofer to your receiver is a simple process that requires attention to detail and patience. By following the necessary steps and ensuring that your equipment is compatible and properly set up, you can enjoy a richer, more immersive audio experience in your home theater. Remember to consult your receiver and subwoofer manuals for specific instructions and troubleshooting tips to ensure a successful connection.
FAQ
Q: What is a passive subwoofer?
A: A passive subwoofer is a speaker that requires an external amplifier or receiver to power it. Unlike an active subwoofer, a passive subwoofer does not have a built-in amplifier.
Q: What do I need to connect a passive subwoofer to a receiver?
A: To connect a passive subwoofer to a receiver, you will need speaker wires, an external amplifier or receiver, and a compatible subwoofer cable. Make sure the subwoofer and the receiver have matching impedance ratings.
Q: How do I connect a passive subwoofer to a receiver?
A: First, connect the subwoofer cable from the subwoofer output on the receiver to the input on the external amplifier. Then, connect the speaker wires from the amplifier to the input terminals on the passive subwoofer, making sure to match the positive and negative terminals.
Q: Why is it important to match impedance ratings for the subwoofer and receiver?
A: Impedance matching ensures maximum power transfer and prevents damage to the equipment. If the impedance ratings do not match, it can result in poor sound quality, overheating, and potential damage to the receiver or subwoofer.
Q: How do I set up the receiver to work with a passive subwoofer?
A: In the receiver’s settings, you will need to configure the speaker setup to include the subwoofer. This may involve setting the crossover frequency, phase, and volume levels for the subwoofer to integrate it seamlessly into your audio system.