Have you ever wondered if your subwoofer is working properly? Perhaps you don’t have a multimeter on hand to test it. Don’t worry, because you can still determine whether your subwoofer is operating correctly without a multimeter. In this guide, we’ll show you simple methods to verify the functionality of your subwoofer without the need for any special equipment. Whether you’re a beginner or an experienced audio enthusiast, these techniques will help you instantly diagnose any issues with your subwoofer’s performance.
Key Takeaways:
- Use a music or sound test: Play a variety of music genres and sound frequencies through the subwoofer to assess its performance. Make note of any distortions, rattling, or lack of response to certain frequencies.
- Listen for clear, deep bass: A properly functioning subwoofer should produce clear and deep bass tones without any distortion or rattling. If the bass sounds muddy or lacks depth, the subwoofer may be faulty.
- Check for physical damage: Inspect the subwoofer for any visible damage such as tears or holes in the cone, loose connections, or damaged cables. Physical damage can affect the subwoofer’s performance and should be addressed accordingly.
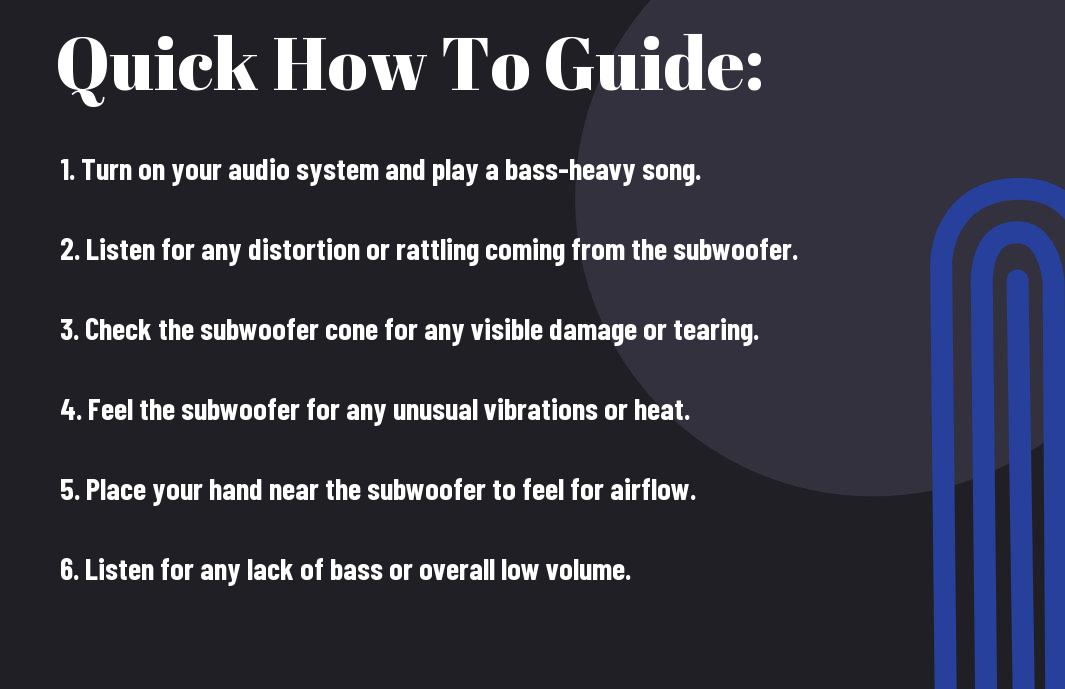
The Basics: How to Test a Subwoofer
Obviously, before you start testing your subwoofer, you need to understand the basic concepts of how a subwoofer works. A subwoofer is designed specifically to reproduce low-frequency sound, or bass. It is responsible for delivering the deep, thumping sounds that you feel in your chest when watching an action movie or listening to your favorite music. As a crucial component of your sound system, it’s essential to ensure that your subwoofer is working correctly to enhance the overall audio experience.
Identifying the Tools You Will Need
Before you begin testing your subwoofer, you will need a few tools to help you through the process. The primary tools you will need include a music or sound source, such as a test tone or bass-heavy music, and a listening area with minimal background noise. Additionally, you may want to have a flashlight and a flashlight to help you inspect the subwoofer’s connections and components.
Step-by-Step Process for Testing a Subwoofer
When testing your subwoofer, it is essential to follow a systematic process to ensure accurate results. Here are the steps you can take to test your subwoofer without a multimeter:
| Step 1 | Check the connections |
| Step 2 | Play a test tone or bass-heavy music |
| Step 3 | Listen for distortion or rattling |
| Step 4 | Inspect the subwoofer visually |
Factors to Consider When Testing a Subwoofer
Now, when testing your subwoofer without a multimeter, there are several important factors that you need to consider in order to ensure that you are getting accurate results. By taking these factors into account, you can effectively evaluate the performance of your subwoofer and make any necessary adjustments.
- The condition of the subwoofer
- The strength of the sound
- The accuracy of the frequency response
After considering these factors, you will be better equipped to assess the overall quality and functionality of your subwoofer.
Condition of the Subwoofer
When testing your subwoofer, it is crucial to take the condition of the subwoofer into consideration. This includes examining the physical state of the subwoofer, such as any visible damage or wear and tear. Additionally, you should also check for any loose connections or wiring that may affect the performance of the subwoofer. Ensuring that the subwoofer is in good condition is essential for obtaining accurate test results and preventing any potential damage to the subwoofer or your audio system.
Strength of the Sound
Another important factor to consider when testing your subwoofer is the strength of the sound it produces. You should pay close attention to the volume and intensity of the bass that the subwoofer is capable of delivering. This will help you determine if the subwoofer is performing at its optimal level and whether it is able to produce the deep, powerful bass that you expect from it. By evaluating the strength of the sound, you can identify any potential issues with the subwoofer’s performance and make any necessary adjustments to improve its overall output.
Additional Tips and Tricks for Testing a Subwoofer
Your subwoofer testing process doesn’t have to end with the basic methods mentioned earlier. Here are some additional tips and tricks to ensure you get the most accurate assessment of your subwoofer’s performance:
- Experiment with different test tracks and frequencies to assess the full range of your subwoofer‘s capabilities.
- Consider using a sound level meter to measure the subwoofer’s output and ensure it aligns with the manufacturer’s specifications.
- Check for any loose connections or damaged wires that could be affecting the subwoofer’s performance.
Recognizing any potential issues or limitations with your subwoofer can help you address them quickly and effectively.
Troubleshooting Common Problems
If you encounter issues with your subwoofer, such as distorted sound or no output at all, it’s essential to troubleshoot the problem effectively. Check for loose connections, damaged cables, or blown fuses that may be affecting the subwoofer’s performance. Additionally, ensure that your subwoofer settings are properly configured and that it is receiving a clean, consistent power supply. Addressing these common problems can help restore your subwoofer’s optimal performance.
How to Maintain Your Subwoofer for Optimal Performance
To ensure your subwoofer continues to perform at its best, it’s essential to maintain it properly. Keep the subwoofer clean and free from dust and debris, as these can affect its performance over time. Additionally, regularly inspect and clean the connections and cables to prevent any issues from arising. Finally, consider investing in a surge protector to safeguard your subwoofer from power surges and fluctuations, which can damage its internal components.
Conclusion
So, now you know that there are alternative ways to test a subwoofer without a multimeter. By using methods such as a battery or a paperclip, you can effectively determine if your subwoofer is functioning properly. Just remember to be cautious and follow the necessary safety precautions when testing your subwoofer without a multimeter. With these tips, you can confidently troubleshoot and diagnose any potential issues with your subwoofer.
FAQ
Q: Why should I test my subwoofer?
A: Testing your subwoofer is important to ensure that it is functioning properly and producing the intended sound quality. Regular testing can help identify any issues early on and prevent any further damage.
Q: How can I test a subwoofer without a multimeter?
A: One way to test a subwoofer without a multimeter is by using an audio source such as a smartphone, tablet, or computer. Connect the subwoofer to the audio source and play a sound with deep bass. Listen for any distortion or abnormalities in the sound output.
Q: What should I listen for when testing a subwoofer without a multimeter?
A: When testing a subwoofer without a multimeter, listen for any buzzing, rattling, or distortion in the sound. These could indicate issues with the subwoofer’s cone, voice coil, or enclosure.
Q: Are there any visual inspections I can perform to test a subwoofer?
A: Yes, you can visually inspect the subwoofer for any physical damage such as tears or holes in the cone, or any loose or disconnected wires. These visual inspections can help identify any obvious issues that may affect the subwoofer’s performance.
Q: What if I suspect a problem with my subwoofer after testing it without a multimeter?
A: If you suspect a problem with your subwoofer after testing it without a multimeter, it is recommended to have it professionally checked by a technician. They can perform a more thorough inspection and diagnosis to identify any underlying issues and provide the necessary repairs.